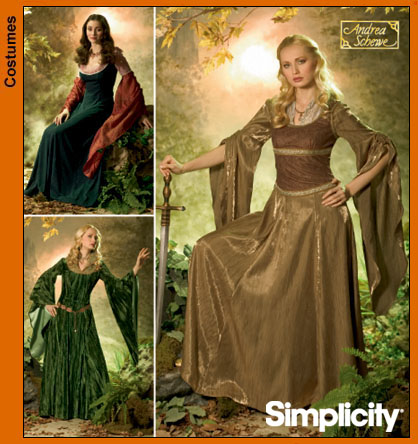
We went with the adult dress on the left. For the pink portion we used a silver blue velveteen and the contrast was in a grey satin. I have made many McCall's patterns in my day and usually I am very happy with them but this time they really dropped the ball! I made the dress in a straight XL as my friend fitted the sizing for this perfectly. This has never happened for me before. I have never sewn anything where the dimensions were so perfectly created. This should have been my first clue that things were not going to go well. With this dress there is a lined bodice with a lace up back. The sleeves are fitted at the top with a fitted under sleeve and then a bell sleeve over top. We left the lower sleeve out and just went with the bell portion as she was concerned about over heating in this dress.
I began both dresses with muslin's that I mailed off for them try on. I most worried about the Simplicity muslin because I had made so many alterations to it. I thought this one would fit fine. She put the dress on and it was a disaster. The bodice was huge! The neck was huge! The sleeves were perfect. Turns out that if you make the dress as patterned you will have 4" of fabric bulk at the laces in the back. Add to this that the neck is so wide that the shoulders of the dress fall off and this dress is just waiting for a wardrobe malfunction!
After some questions (thank heavens for Skype) I had her place the dress on the shoulder line and line up the side seams to confirm that the bulk was limited to the back and to be sure that the falling down was limited to the width of the neck not the shortness of her shoulders. Sure enough it fit perfectly. I needed to take four inches out of the back of the dress!
Modifications
Well this one proved a real struggle for me. I had to redesign the back of the dress. My friend decided she didn't like the laces up the back and decided she wanted a zipper instead. Can't say I blame her. The dress doesn't have a facing underneath the laces you are just to tie it up so the edges come together. The next problem was the bulk in the back. I spent a whole day trying to figure this out. My challenge was that the shoulder points were in the right place as the dress was designed. So I needed to take some out at the centre back and some out under the arm without altering the armhole cause the sleeves fit perfectly! Oh my, my brain hurt. I ended up taking out 1 1/2" from the centre back and 5/8" out from just before the arm hole but after the back dart. This kept everything in the right place but gave the back a smooth finish.
The next problem was the neckline. If you make this dress in any fabric heavier then a lining weight fabric there is no way with the quantity of sleeves that this dress is going to stay up. The finished width of the shoulder is 1 1/2". Not much room to work with. I ended up just adding a straight 1" to the front shoulder piece that I tapered into the neck scoop so that it was back to original drafting by the bib. On the back I added one inch to the entire top of the neck opening from the zipper to the shoulder seam.
I removed 1 1/2" of length from the skirt.
Construction
The instructions for this dress are very clear but not a very nice way to construct it. It has you create a lining for the bodice and attach it to the outer fabric at the neck line to the bib. Now the first problem is getting the lining to line up while still being able to insert the bib. The next problem is getting the bib in and catching both layers of fabric when sewing in the bib. The final problem is the sleeves. You go to all the trouble of inserting lining in the sleeves but when you attach the sleeve to the bodice you don't cover the sleeve seam! Maybe I am missing something here but if I am sewing in a lining I want nice arm holes! So this was just not going to work. On to attempt number 2!
For the second try I made the bodice of fabric and sewed in the upper sleeves. Then I sewed the bodice in lining and attached the bib and the upper sleeves. I then inserted the lining into the dress bodice and sewed the lining to the bodice at the neck edge. I slightly set the lining back from the neck edge of the dress so the lining wouldn't show as we weren't adding the trim to the neckline. This worked perfectly. Everything else went together exactly as per the instructions.
Comments
I will never make this dress again! The finished dress looks okay but I know that I could have done better if I had spent more time remaking this pattern but then why should I remake a pattern to this extent. There has to be something better out there. It looks beautiful on her and the additions at the neck make the dress fit much better which is good with all the weight in those sleeves. The concept of the dress is beautiful but the design of the neck and the back are just all wrong. I have to believe that if the model turned around in the picture you would see piles of clothespins holding this dress closed.

I had to use clothespins just to keep it on the hanger. Anyway it is done and my friend looks beautiful in it. The colour is perfect for her and it turned out nicely fitted to her.
Now I think I will move on to sewing something with straight lines! I think I needed a quilting project.